
Solar Inverter Commissioning: Complete Setup Guide (2026)
Solar inverter commissioning is the critical final step that transforms a solar installation from a collection of components into a fully functional, high-performing energy system. For EPCs and solar installers across India, proper inverter commissioning determines whether a solar project delivers optimal efficiency from day one or becomes a source of performance issues and warranty claims. This comprehensive guide walks you through the complete inverter commissioning protocol, covering pre-installation checks, electrical testing, system configuration, monitoring setup, and final handover procedures that ensure every solar installation meets the highest standards of quality and performance.
With India’s solar market rapidly expanding and high-wattage panels (750W+) becoming standard, the complexity of inverter commissioning has increased significantly. Modern inverters equipped with AI-powered monitoring, hybrid capabilities, and advanced grid management features require systematic commissioning protocols that go beyond basic startup procedures. Whether you’re deploying residential on-grid systems or large-scale commercial installations, following manufacturer-specific commissioning guidelines protects your investment, validates warranty coverage, and establishes the foundation for decades of reliable solar power generation.
Understanding Solar Inverter Commissioning: Why It Matters
Inverter commissioning is the systematic process of verifying, testing, configuring, and validating that a solar inverter operates correctly according to design specifications and manufacturer requirements. This process goes far beyond simply switching on the inverter—it involves comprehensive electrical testing, parameter configuration, safety verification, and performance validation that ensures the entire solar system functions optimally and safely.

The importance of proper inverter commissioning cannot be overstated for several critical reasons. First, it directly impacts system performance and energy yield. An improperly commissioned inverter may operate at reduced efficiency, fail to track maximum power points effectively, or experience frequent shutdowns due to incorrect grid parameters. These issues translate directly into lost revenue for commercial installations and reduced savings for residential customers.
Second, commissioning validates warranty coverage. Most premium inverter manufacturers, including those offering 12-year warranties, require documented proof of proper commissioning performed by qualified technicians. Skipping commissioning steps or failing to document the process can void warranty protection, leaving EPCs and customers financially exposed to equipment failures. The digital warranty systems now available make it easier than ever to register commissioned systems and activate full warranty protection.
Third, proper inverter commissioning identifies installation errors before they cause system failures. Common issues like reversed polarity, inadequate grounding, incorrect cable sizing, or improper surge protection installation can be detected and corrected during commissioning, preventing safety hazards and equipment damage. In India’s challenging environmental conditions—with extreme temperatures, monsoon moisture, and grid instability—these preventive checks are especially critical.
Finally, commissioning establishes baseline performance data that enables effective long-term monitoring and maintenance. By documenting initial performance metrics, voltage levels, and efficiency measurements, you create reference points for troubleshooting future issues and verifying that the system continues to perform as designed throughout its operational life.
1. Pre-Commissioning Preparation and Documentation
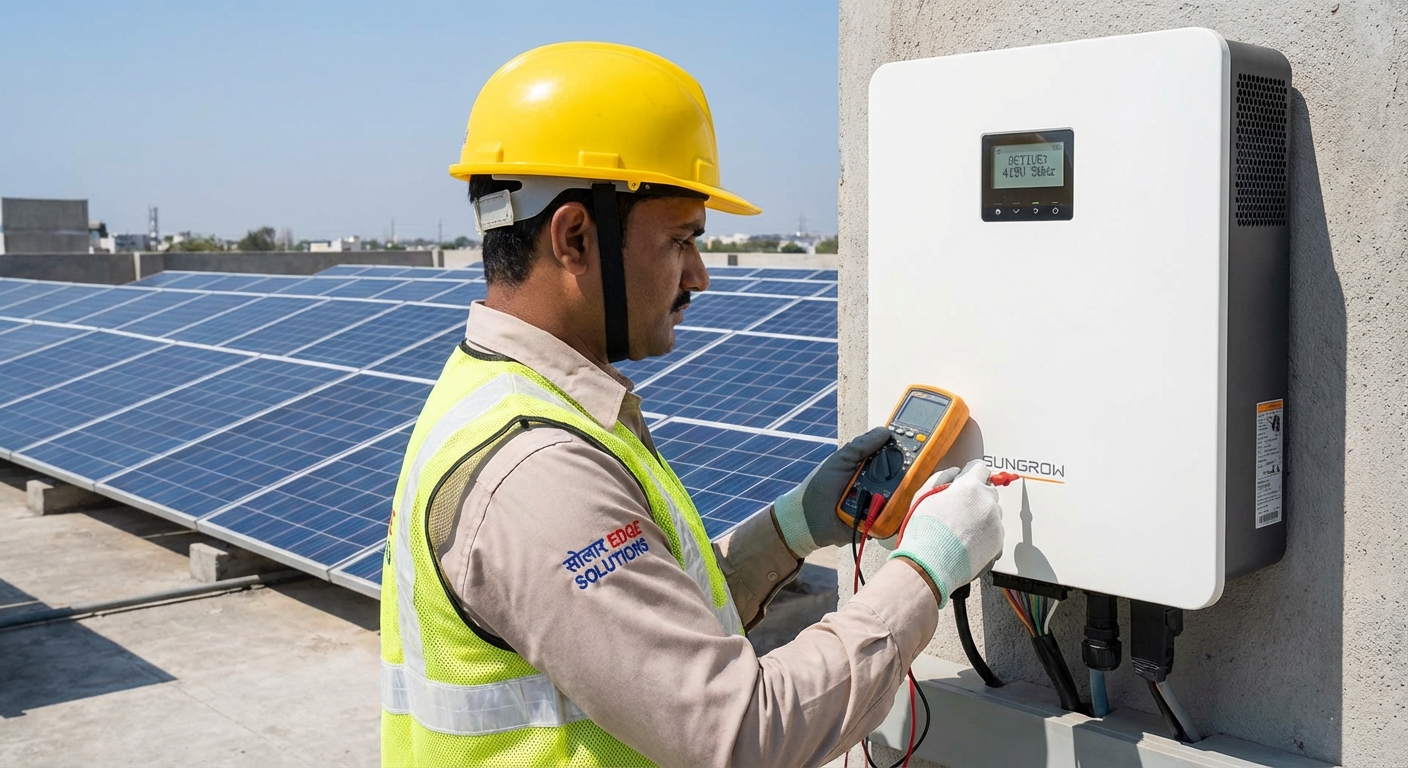
Successful inverter commissioning begins long before you power up the system. Thorough preparation ensures you have the right tools, documentation, and site conditions to complete commissioning efficiently and correctly. Start by assembling your essential commissioning toolkit, which should include a digital multimeter capable of measuring DC voltages up to 1000V and AC voltages up to 500V, an insulation resistance tester (megger) rated for at least 1000V, a clamp meter for current measurements, an infrared thermometer for temperature monitoring, and a power quality analyzer for grid parameter verification.
Safety equipment is non-negotiable for inverter commissioning work. Ensure your team has insulated gloves rated for electrical work, safety glasses, hard hats, and arc-rated clothing appropriate for the voltage levels involved. Working with DC voltages from solar arrays presents unique hazards—unlike AC systems, DC circuits don’t have natural zero-crossing points, making arc faults particularly dangerous.
Documentation review is equally critical. Before arriving on site, thoroughly review the inverter datasheet, installation manual, and commissioning checklist provided by the manufacturer. For advanced inverters with features like IP66 weather protection and AI-powered monitoring, understanding the specific configuration requirements ensures you don’t miss critical setup steps. Review the electrical single-line diagram to understand the complete system architecture, including string configurations, combiner boxes, AC distribution, and grid connection points.
Coordinate with utility providers well in advance of commissioning. In India, grid connection requirements vary by state and utility company. Verify that you have the necessary approvals for grid interconnection, understand the local grid code requirements, and confirm the utility’s voltage and frequency specifications. Some utilities require witness testing or specific documentation before authorizing grid connection, so factor these requirements into your commissioning timeline.
Create a comprehensive pre-commissioning checklist that covers site readiness, equipment availability, documentation completeness, and safety preparations. This checklist should verify that all mechanical installation is complete, all electrical connections are terminated, all labeling is in place, and the site is safe for energization. A systematic approach to pre-commissioning preparation prevents delays and ensures you can complete the commissioning process in a single site visit.
2. Physical Installation Verification and Safety Checks
Before conducting any electrical tests, perform a thorough physical inspection of the inverter installation. This visual and mechanical verification identifies issues that could compromise safety, performance, or longevity. Begin by inspecting the inverter mounting to ensure it’s securely attached to a structurally sound surface. Check that the mounting hardware is appropriate for the wall or mounting structure type and that all fasteners are properly tightened. An inverter that’s inadequately secured can vibrate loose over time or fall during extreme weather events.
Verify ventilation and clearance requirements according to manufacturer specifications. Inverters generate heat during operation, and inadequate ventilation leads to thermal derating, reduced efficiency, and shortened component life. Most inverters require minimum clearances on all sides—typically 30-50cm, to ensure proper airflow. In India’s hot climate, where ambient temperatures can exceed 45°C, proper ventilation is especially critical for maintaining rated performance.
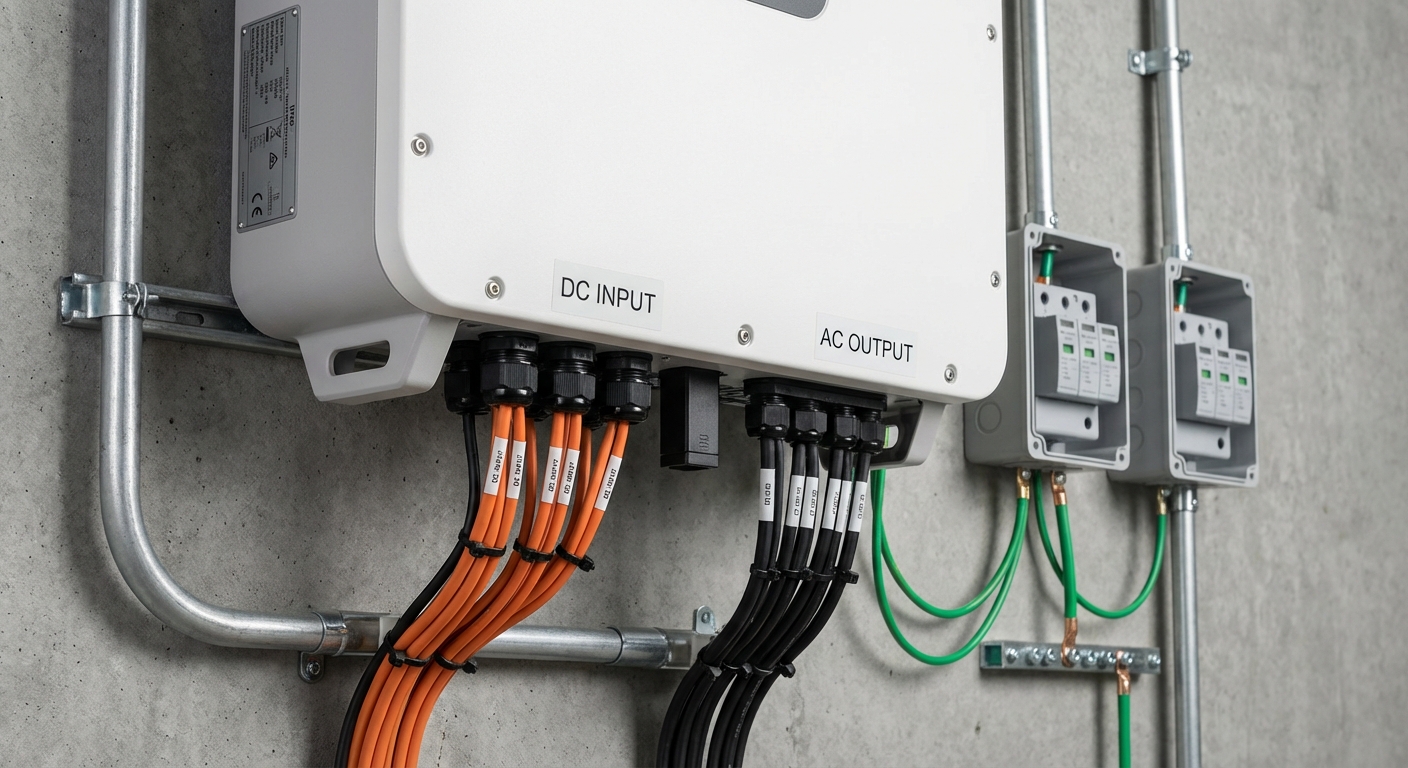
For inverters with IP66 weather protection, inspect the enclosure sealing carefully. Check that all cable glands are properly installed and tightened, that the enclosure door gasket is intact and properly seated, and that no gaps exist where dust or moisture could enter. While IP66-rated enclosures are designed for harsh rooftop conditions, improper installation can compromise this protection. Pay special attention to the bottom cable entry points, as these are most vulnerable to water ingress during monsoon rains.
Cable routing and termination inspection is a critical component of inverter commissioning. Verify that DC and AC cables are properly sized according to the system design and electrical codes. Check that cables are routed to avoid sharp edges, excessive heat exposure, and UV degradation. Inspect all terminations at the inverter, ensuring that conductors are properly stripped, crimped or terminated, and tightened to manufacturer-specified torque values. Loose connections are a leading cause of inverter failures and can create dangerous arc faults.
Verify that DC and AC surge protection devices (SPDs) are properly installed and connected. SPDs protect expensive inverter electronics from voltage spikes caused by lightning strikes and grid disturbances, common occurrences in India. Check that SPDs are rated appropriately for the system voltage, that they’re connected with the shortest possible lead lengths, and that their status indicators show they’re functional. Replace any SPDs showing fault indicators before proceeding with commissioning.
Grounding and earthing system inspection is essential for both safety and performance. Verify that the inverter chassis is properly bonded to the system grounding electrode, that all grounding connections are tight and corrosion-free, and that the grounding conductor sizing meets code requirements. For systems with multiple inverters, ensure that all equipment is bonded to a common grounding point to prevent ground loops and potential differences that can damage equipment.
Complete your physical inspection with a thorough visual check for any signs of physical damage, manufacturing defects, or shipping damage. Look for cracked displays, damaged connectors, dented enclosures, or any other abnormalities. Addressing these issues before energization prevents safety hazards and ensures warranty coverage isn’t compromised by operating damaged equipment.
3. Electrical Testing and Measurement Protocol
With physical installation verified, proceed to electrical testing, the heart of the inverter commissioning process. These tests verify that the electrical installation is safe, correctly configured, and ready for energization. Always follow lockout-tagout procedures and verify that the system is de-energized before beginning electrical tests.
Start with DC side testing by measuring string voltages at the inverter DC terminals. With the DC disconnect open and solar irradiation present, measure the open-circuit voltage (Voc) of each string. Compare these measurements to expected values based on the panel specifications and number of panels per string. Significant deviations indicate potential issues like shading, panel damage, or incorrect string configuration. Verify that string voltages fall within the inverter’s input voltage range, exceeding maximum input voltage can permanently damage the inverter.
Check DC polarity carefully before connecting strings to the inverter. Reversed polarity is a common installation error that can damage inverter input circuits. Use your multimeter to verify that positive and negative conductors are correctly identified and terminated. For inverters with multiple MPPT inputs, verify that strings are connected to the intended MPPT channels according to the system design.
Insulation resistance testing (megger testing) is a critical safety verification that detects insulation breakdown, moisture ingress, or damaged cables that could create ground faults. With all DC disconnects open and the inverter isolated, perform insulation resistance tests between positive and ground, negative and ground, and positive and negative. Industry standards typically require minimum insulation resistance of 1 megohm, though many installers use a higher threshold of 10 megohms for added safety margin. Low insulation resistance indicates problems that must be resolved before energization.
On the AC side, verify grid voltage and frequency before connecting the inverter. Use your multimeter or power quality analyzer to measure line-to-line and line-to-neutral voltages, ensuring they fall within the inverter’s acceptable range. In India, grid voltage can vary significantly by location and time of day, so verify that the measured voltage is stable and within the inverter’s operating window. Measure grid frequency to confirm it’s within the standard 50 Hz ± tolerance specified by the inverter manufacturer.
Perform earth continuity and resistance testing to verify the integrity of the grounding system. Measure the resistance between the inverter chassis and the main grounding electrode, this should typically be less than 1 ohm. High ground resistance indicates poor grounding connections that must be corrected to ensure safety and proper inverter operation. Many modern inverters monitor ground resistance continuously and will fault if grounding is inadequate.
For systems with multiple strings, check for string current imbalance that could indicate shading issues, panel mismatch, or wiring problems. While some current variation is normal due to manufacturing tolerances, significant imbalances (greater than 10-15%) warrant investigation. String current imbalance reduces system efficiency and can cause uneven aging of panels.
For hybrid inverters with battery integration, perform additional testing of the battery connections, battery voltage, and battery management system (BMS) communication. Verify that battery polarity is correct, that battery voltage matches the inverter’s requirements, and that the BMS is communicating properly with the inverter. Incorrect battery configuration can damage both the inverter and the battery system.
4. System Configuration and Parameter Settings
With electrical testing complete and all measurements within acceptable ranges, proceed to system configuration, the process of programming the inverter with the correct operating parameters for your specific installation. This step is crucial for ensuring the inverter operates safely, complies with grid codes, and delivers optimal performance throughout its operational life.
Follow the manufacturer’s specified startup sequence carefully. Most inverters require a specific power-up procedure: close the DC disconnect first to energize the DC side, then close the AC disconnect to enable grid connection. Some inverters have additional startup steps involving display menus or button sequences. Deviating from the specified startup sequence can trigger fault conditions or damage the inverter.
Configure grid code and country-specific parameters for India. Modern inverters support multiple grid codes to comply with different regional requirements. Select the appropriate grid code for your location, typically “India” or a specific state code if available. This setting configures critical protection parameters including voltage and frequency trip points, reconnection delays, and power quality requirements. Incorrect grid code settings can cause nuisance tripping or, worse, fail to protect the grid during fault conditions.
Set voltage and frequency protection thresholds according to local utility requirements and Indian standards. These settings determine when the inverter disconnects from the grid during abnormal conditions. While default settings typically comply with national standards, some utilities have specific requirements that differ from defaults. Verify these settings with your utility’s interconnection agreement and configure accordingly.
Configure power factor and reactive power settings if your installation requires specific power factor control. Commercial and industrial installations often have power factor requirements specified by the utility or the customer. Modern inverters can operate at adjustable power factors or provide reactive power support to the grid. Configure these settings according to your interconnection agreement or customer requirements.
For inverters supporting DC oversizing, configure the maximum DC input power settings. Many modern inverters support up to 100% DC oversizing, allowing you to connect more panel capacity than the inverter’s rated AC output. This oversizing improves energy harvest during low-light conditions and early morning/late evening hours. Configure the inverter to handle your specific DC array size, ensuring it won’t limit power production unnecessarily.
Optimize maximum power point tracking (MPPT) settings for your array configuration. While most inverters use automatic MPPT algorithms that don’t require manual configuration, some advanced inverters allow you to adjust MPPT parameters for specific conditions. For installations with partial shading or complex roof orientations, optimized MPPT settings can improve energy harvest significantly.
For hybrid inverters, configure battery integration settings including battery type, capacity, charge/discharge rates, and operating modes. Set the battery charging parameters according to the battery manufacturer’s specifications to ensure optimal battery life. Configure operating modes such as self-consumption, backup power, or time-of-use optimization according to the customer’s requirements and utility rate structure.
Synchronize the inverter’s internal clock with the correct date, time, and time zone. Accurate timekeeping is essential for data logging, time-of-use optimization, and troubleshooting. Many inverters with internet connectivity can synchronize time automatically, but verify that the displayed time is correct before completing commissioning.
5. Monitoring System Setup and Connectivity Testing
Modern inverter commissioning isn’t complete without configuring the monitoring system that enables remote performance tracking, fault detection, and proactive maintenance. Advanced monitoring capabilities, including AI-powered analytics and WhatsApp alerts, transform solar installations from passive energy generators into intelligent, self-monitoring systems that maximize uptime and energy production.
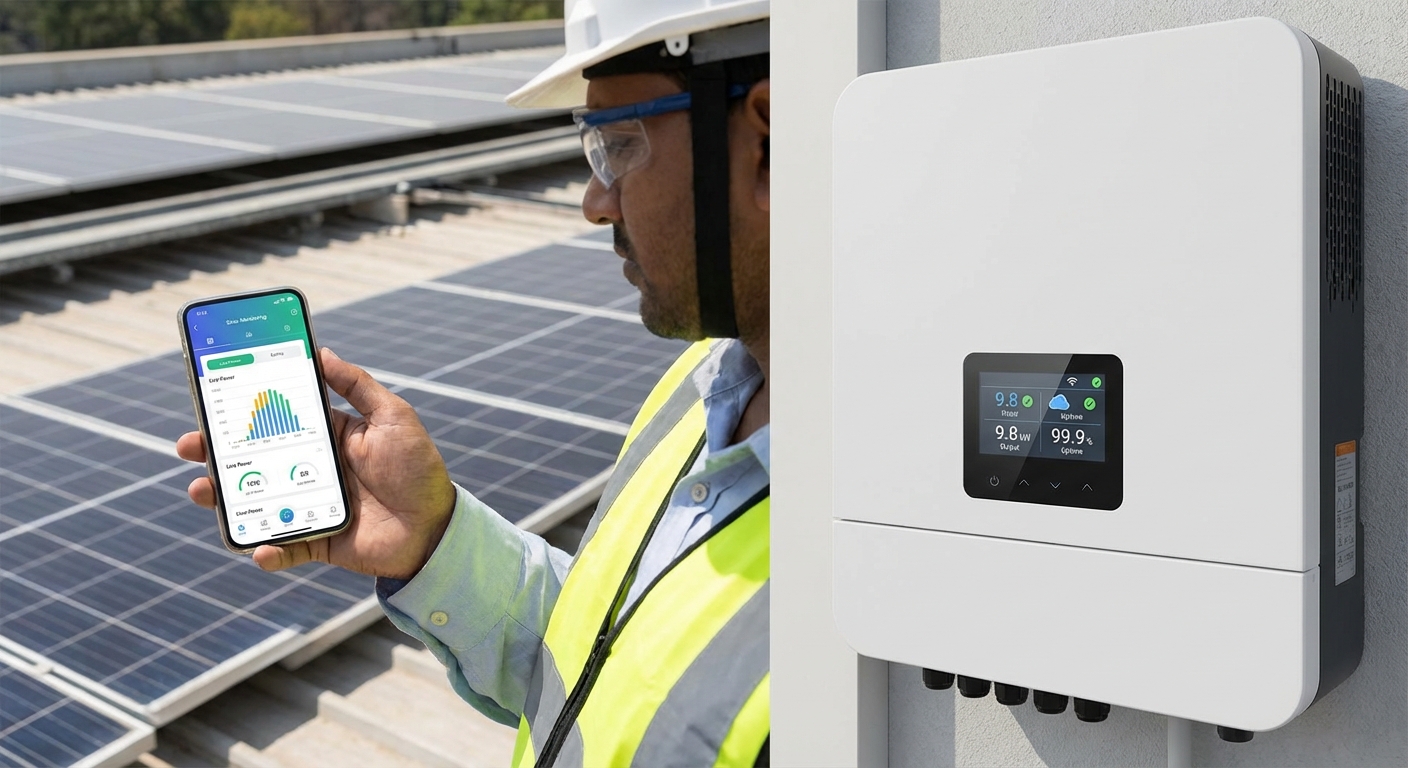
Begin monitoring setup by configuring the inverter’s connectivity options. Modern inverters offer multiple connectivity methods including Wi-Fi, 4G cellular, and Bluetooth. For Wi-Fi connectivity, access the inverter’s configuration interface and connect it to the site’s wireless network. Enter the network SSID and password, and verify that the inverter successfully connects and obtains an IP address. For installations without reliable Wi-Fi, configure 4G connectivity using the inverter’s built-in cellular modem or an external communication device.
Register the inverter with the manufacturer’s monitoring platform. This typically involves creating an account on the monitoring portal, entering the inverter’s serial number, and associating it with the installation site. For systems with multiple inverters, register each unit and configure them as part of a single plant or installation. Proper registration is often required for warranty activation, so don’t skip this step.
Configure AI-powered monitoring features that enable intelligent fault detection and performance optimization. Advanced monitoring systems use machine learning algorithms to establish baseline performance patterns, detect anomalies, and predict potential failures before they occur. Set up the monitoring system to learn your installation’s normal operating characteristics during the first few weeks of operation.
Set up WhatsApp monitoring integration for real-time alerts and remote system access. This innovative feature allows installers and customers to receive instant notifications of system faults, performance issues, or maintenance requirements directly through WhatsApp, a communication platform widely used across India. Configure alert thresholds for critical parameters like grid disconnection, low energy production, or communication loss. Customize notification recipients so that EPCs receive technical alerts while customers receive simplified performance updates.
Verify data logging functionality by checking that the inverter is recording performance data and successfully uploading it to the cloud monitoring platform. Access the monitoring portal and confirm that you can see real-time data including power output, energy production, voltage levels, and system status. Verify that historical data is being logged correctly for future performance analysis and troubleshooting.
Install and configure the mobile monitoring app on the customer’s smartphone or tablet. Walk through the app interface, demonstrating how to view real-time performance, check energy production history, and receive system alerts. For EPCs managing multiple installations, configure fleet monitoring capabilities that allow you to oversee all your deployed systems from a single dashboard.
Test alert functionality by simulating a fault condition or triggering a test alert through the monitoring system. Verify that alerts are delivered promptly through the configured channels (email, SMS, WhatsApp) and that they contain sufficient information for effective troubleshooting. Configure alert escalation so that persistent faults trigger additional notifications if not addressed within a specified timeframe.
For commercial installations with multiple stakeholders, configure user access levels and permissions. Set up separate accounts for the system owner, facility manager, EPC, and maintenance provider, each with appropriate access rights. This ensures that sensitive configuration settings are protected while still providing necessary visibility to all stakeholders.
6. Performance Testing and Load Verification
With the inverter configured and monitoring active, conduct comprehensive performance testing to verify that the system operates correctly under real-world conditions. Performance testing validates that the inverter delivers the expected efficiency, responds appropriately to varying solar irradiation, and maintains stable grid connection under different operating scenarios.
Begin performance testing during a period of stable solar irradiation, ideally mid-morning or mid-afternoon when the sun is high and cloud cover is minimal. Monitor the system startup sequence as the inverter begins generating power. Verify that the inverter starts at the specified low start-up voltage, typically around 80-100V for modern inverters. Low start-up voltage is particularly valuable in India, where early morning and late evening generation extends the productive hours of the solar installation.
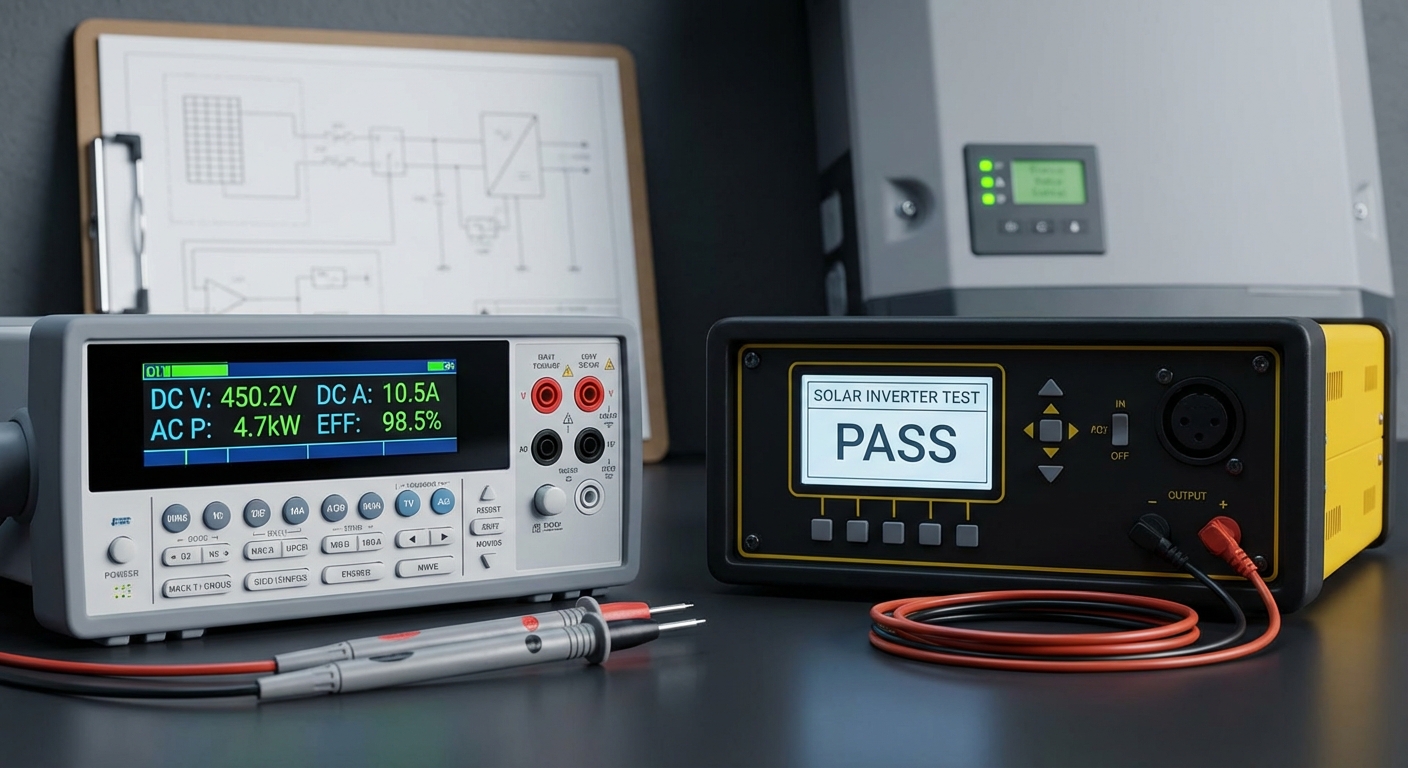
Measure power output at the inverter’s AC terminals and compare it to the expected output based on current solar irradiation and array capacity. Use your clamp meter to measure AC current on each phase (for three-phase inverters) and verify that the phases are balanced. Significant phase imbalance indicates wiring issues or inverter problems that require investigation.
Verify inverter efficiency by comparing DC input power to AC output power. Modern inverters should achieve 98% efficiency or higher at rated power. Calculate efficiency by dividing AC output power by DC input power and multiplying by 100. While efficiency varies with load level, typically peaking at 30-50% of rated power, the inverter should meet manufacturer specifications across its operating range. Lower-than-expected efficiency indicates problems with the inverter or installation.
Test maximum power point tracking (MPPT) performance by monitoring how quickly and accurately the inverter tracks the optimal operating point as irradiation changes. Observe the DC voltage and current as clouds pass or as irradiation levels change naturally. The inverter should continuously adjust its operating point to extract maximum power from the array. Sluggish MPPT response or failure to track the optimal point indicates configuration issues or inverter problems.
Verify grid synchronization and power quality by measuring voltage, frequency, and power factor at the inverter’s AC output. Use a power quality analyzer to check for harmonic distortion, which should be within the limits specified by grid codes (typically less than 5% total harmonic distortion). Excessive harmonics can cause problems with other electrical equipment and may violate utility interconnection requirements.
Conduct load testing at different irradiation levels to verify stable operation across the inverter’s operating range. Observe system performance during low irradiation (early morning or late afternoon), moderate irradiation (mid-morning or mid-afternoon), and peak irradiation (midday). The inverter should operate smoothly at all power levels without unexpected shutdowns, error messages, or performance anomalies.
Perform temperature rise testing by monitoring inverter temperature under full load conditions. Use an infrared thermometer to measure the temperature of the inverter enclosure, heatsinks, and ventilation areas. Compare measured temperatures to manufacturer specifications. Excessive temperature rise indicates inadequate ventilation, high ambient temperature, or inverter problems. In India’s hot climate, thermal management is critical for maintaining rated performance and ensuring long inverter lifespan.
Test the inverter’s response to grid disturbances by observing its behavior during voltage fluctuations or frequency variations. While you shouldn’t intentionally create severe grid disturbances, natural grid variations provide opportunities to verify that the inverter responds appropriately. The inverter should ride through minor disturbances and disconnect only when voltage or frequency exceeds protection thresholds. Nuisance tripping during normal grid variations indicates incorrect parameter settings that need adjustment.
For hybrid inverters, test battery charging and discharging functionality. Verify that the inverter charges the battery at the configured rate when excess solar power is available. Test backup power operation by simulating a grid outage (if safe to do so) and verifying that the inverter seamlessly transitions to battery power for critical loads. Confirm that battery state-of-charge is accurately displayed and that the inverter respects configured charge/discharge limits.
7. Final Handover, Documentation, and Warranty Activation
The final phase of inverter commissioning involves comprehensive documentation, customer training, and warranty activation, steps that are just as important as the technical commissioning work. Proper documentation protects all stakeholders, enables effective maintenance, and ensures warranty coverage remains valid throughout the inverter’s operational life.
Prepare a detailed commissioning report that documents all tests performed, measurements recorded, and configuration settings applied. This report should include DC voltage and current measurements for each string, insulation resistance test results, AC voltage and frequency measurements, efficiency calculations, and any issues encountered during commissioning along with their resolutions. Include photographs of the completed installation, showing the inverter, cable routing, labeling, and overall system layout.
Register the system with the manufacturer’s digital warranty system to activate the full warranty coverage. For inverters offering 12-year warranties, proper registration and commissioning documentation are typically required to validate warranty claims. Enter all required information including installation date, commissioning date, installer details, and customer information. Upload commissioning test results and installation photos as supporting documentation. The digital warranty system provides a permanent record that protects both the installer and the customer.
Conduct comprehensive customer training on system operation and monitoring. Walk the customer through the monitoring app or web portal, showing them how to check daily energy production, view system status, and understand alert notifications. Explain normal system behavior, including startup and shutdown sequences, and what to do if they receive alerts. For commercial installations, train facility managers on basic troubleshooting procedures and when to contact professional support.
Provide complete handover documentation including the inverter operation manual, installation manual, warranty certificate, commissioning report, and system design documentation. Include contact information for technical support, maintenance services, and emergency assistance. For systems with advanced features like AI-powered monitoring, provide user guides that explain how to interpret monitoring data and use advanced features.
Review the maintenance schedule with the customer, explaining recommended inspection intervals, cleaning procedures, and preventive maintenance tasks. While modern inverters require minimal maintenance, periodic inspections help identify potential issues before they cause system downtime. Provide clear guidance on what maintenance tasks the customer can perform themselves (like cleaning the inverter exterior) and what requires professional service.
Complete the final inspection checklist, verifying that all commissioning steps have been completed, all documentation is in order, and the system is ready for long-term operation. Have the customer sign off on the commissioning report, acknowledging that they’ve received training, documentation, and that the system is operating as expected. This sign-off provides legal protection and confirms that the installation has been properly handed over.
Configure post-commissioning support and monitoring. For EPCs offering ongoing maintenance services, set up remote monitoring access so you can proactively track system performance and respond to issues before customers even notice them. Schedule a follow-up inspection for 30-60 days after commissioning to verify that the system continues to perform optimally and address any questions or concerns that arise during the initial operating period.
Common Inverter Commissioning Challenges in India and Solutions
Solar installers across India encounter specific challenges during inverter commissioning that require practical solutions and local expertise. Understanding these common issues and their resolutions helps EPCs complete commissioning efficiently and deliver reliable solar installations.
Grid instability and voltage fluctuations are perhaps the most common challenge in India. Many areas experience significant voltage variations, frequent power cuts, and poor power quality that can cause inverters to trip repeatedly. Solution: Configure wider voltage and frequency tolerance windows within the inverter’s capabilities and grid code requirements. Install voltage stabilizers or power conditioning equipment for sites with severe grid issues. Consider hybrid inverters with battery backup that can ride through grid disturbances and provide uninterrupted power to critical loads.
High ambient temperatures affect inverter performance across much of India, particularly during summer months when temperatures can exceed 45°C. Inverters derate their output at high temperatures to protect internal components, reducing energy production. Solution: Ensure adequate ventilation around the inverter, install sunshades or cooling systems for inverters exposed to direct sunlight, and consider mounting inverters on north-facing walls or in shaded locations. Select inverters with high temperature ratings and robust thermal management designed for hot climates.
Dust and moisture ingress during monsoon season and in dusty environments can compromise inverter electronics and reduce reliability. Solution: Verify that inverters have appropriate IP ratings (IP66 or higher) for the installation environment. Ensure all cable glands and enclosure seals are properly installed during commissioning. Schedule regular cleaning and inspection, particularly before and after monsoon season. For extremely harsh environments, consider installing inverters in protective enclosures with filtered ventilation.
Communication connectivity issues in remote or rural locations can prevent proper monitoring system setup. Weak cellular signals, unreliable internet connectivity, or lack of Wi-Fi infrastructure complicate remote monitoring configuration. Solution: Use inverters with multiple connectivity options including 4G with external antenna capability. Install cellular signal boosters or use high-gain antennas to improve signal strength. For sites with no connectivity options, configure local data logging and schedule periodic site visits to download performance data.
String mismatch and shading problems often become apparent during commissioning when you measure string voltages and currents. Significant variations between strings indicate shading issues, panel orientation differences, or installation errors. Solution: Investigate the root cause through careful site inspection and solar path analysis. Reconfigure string layouts to group similarly-shaded panels together. Consider power optimizers or microinverters for installations with unavoidable shading. Ensure proper MPPT channel assignment for strings with different characteristics.
Improper grounding leading to safety hazards and inverter faults is a common issue that becomes evident during commissioning testing. High ground resistance or missing ground connections can cause inverter faults and create dangerous touch voltages. Solution: Perform thorough ground resistance testing during commissioning and remediate any grounding deficiencies before energizing the system. Install additional ground rods if necessary to achieve acceptable ground resistance. Verify all equipment bonding connections and ensure proper grounding conductor sizing.
Inverter Commissioning Best Practices for EPCs and Installers
Successful inverter commissioning requires more than just technical knowledge, it demands systematic processes, attention to detail, and commitment to quality that distinguishes professional EPCs from amateur installers. Implementing these best practices ensures consistent commissioning quality across all your installations.
Always follow manufacturer-specific commissioning protocols rather than generic procedures. Each inverter model has unique requirements, configuration options, and startup sequences. Manufacturers like Qbits provide detailed commissioning checklists and procedures developed specifically for their products. Deviating from these procedures can void warranties, cause equipment damage, or result in suboptimal performance. When working with a new inverter model, thoroughly review the commissioning documentation before your first installation.
Implement quality assurance through systematic testing procedures and documentation. Create standardized commissioning checklists for your organization that incorporate manufacturer requirements and your own quality standards. Use these checklists consistently on every installation to ensure no steps are missed. Document all test results, even when they’re within normal ranges, this documentation proves invaluable for troubleshooting future issues and validating warranty claims.
Maintain rigorous documentation standards for warranty compliance and future reference. Take detailed photographs of the installation before, during, and after commissioning. Record all configuration settings, test measurements, and any deviations from standard procedures. Store this documentation in an organized system that allows easy retrieval when needed. Digital documentation systems that integrate with warranty platforms streamline this process and ensure documentation is never lost.
Establish ongoing performance monitoring post-commissioning rather than treating commissioning as a one-time event. Configure monitoring systems to alert you to performance degradation, communication loss, or fault conditions. Review performance data regularly for all your installed systems, looking for trends that might indicate developing problems. Proactive monitoring allows you to address issues before they cause significant downtime or customer complaints.
Invest in training and certification for your commissioning technicians. Manufacturer training programs provide in-depth knowledge of specific inverter models, advanced features, and troubleshooting techniques. Certified technicians are better equipped to handle complex commissioning scenarios and are often required for warranty validation. Regular training keeps your team current with evolving technology and best practices in the rapidly advancing solar industry.
Leverage advanced features like AI-powered monitoring for proactive maintenance and performance optimization. Modern monitoring systems do more than just display current power output, they analyze performance patterns, predict potential failures, and recommend optimization strategies. Train your team to use these advanced features effectively, transforming monitoring data into actionable insights that improve system performance and customer satisfaction.
When selecting inverters for your projects, prioritize manufacturers that provide comprehensive commissioning support, detailed documentation, and responsive technical assistance. The quality of manufacturer support directly impacts your commissioning efficiency and your ability to resolve issues quickly. Consider factors like warranty terms, monitoring platform capabilities, and the manufacturer’s track record in the Indian market. Choosing the right inverter manufacturer is as important as proper commissioning procedures.
Understanding proper inverter selection criteria before installation ensures that commissioning proceeds smoothly. Inverters that are appropriately sized, properly specified for the application, and well-suited to local conditions are easier to commission and more likely to deliver long-term performance. Factor commissioning complexity into your inverter selection decisions, particularly for large or complex installations.
Conclusion: Ensuring Long-Term Solar System Success Through Proper Commissioning
Proper inverter commissioning is the foundation of every successful solar installation. This systematic process, from pre-commissioning preparation through final handover, ensures that solar systems deliver optimal performance, operate safely, and provide reliable returns on investment throughout their operational life. For EPCs and installers across India, mastering commissioning protocols distinguishes professional installations from amateur work and builds the reputation that drives business growth.
The complexity of modern solar inverters, with advanced features like AI-powered monitoring, hybrid capabilities, and intelligent grid management, demands equally sophisticated commissioning procedures. By following the comprehensive protocol outlined in this guide, including thorough electrical testing, precise configuration, monitoring setup, and detailed documentation, you ensure that every installation meets the highest standards of quality and performance. Proper inverter commissioning protects your customers’ investments, validates warranty coverage, and establishes the baseline for decades of reliable solar power generation.
As India’s solar market continues its rapid expansion, the demand for skilled commissioning professionals will only increase. EPCs that invest in proper training, systematic processes, and quality documentation will differentiate themselves in an increasingly competitive market. The time invested in thorough commissioning pays dividends through reduced callbacks, higher customer satisfaction, and systems that perform as designed year after year.
Ready to ensure your solar installations deliver optimal performance from day one? Qbits Energy provides comprehensive commissioning support, detailed technical documentation, and responsive technical assistance for all our inverter products. Our advanced monitoring systems with AI-powered analytics and WhatsApp integration make post-commissioning performance tracking effortless. Contact our technical team to discuss your commissioning requirements, access detailed commissioning protocols, or learn how our 12-year warranty and digital warranty system protect your installations. For EPCs looking to partner with a manufacturer that prioritizes quality and support, explore our partnership program and discover how Qbits Energy can help you deliver superior solar installations across India. Visit our product portfolio to learn more about our on-grid and hybrid inverters engineered for reliable performance in India’s challenging conditions.
This blog post was written using thestacc.com