
Solar Inverter Integration in India: 2026 Setup Guide

Solar inverter integration is the backbone of every successful solar installation in India. Whether you are commissioning a 5 kW rooftop system for a homeowner in Ahmedabad or a 500 kW commercial plant for a factory in Pune, the quality of your inverter integration process determines system performance, safety, and long-term return on investment. Yet many EPCs and installers still treat integration as a simple plug-and-play task, leading to underperforming systems, warranty voids, and costly callbacks. This guide changes that. It walks you through every stage of solar inverter integration in India, from pre-installation planning to post-commissioning optimization, so your projects deliver maximum efficiency from day one.
What Is Solar Inverter Integration and Why It Matters in India
Solar inverter integration is the complete process of mechanically installing, electrically connecting, configuring, and commissioning a solar inverter within a broader energy system. It covers everything from DC string wiring and AC grid connection to battery coupling, monitoring setup, and smart feature activation. Done correctly, inverter integration ensures that every component in the system, including panels, batteries, the grid, and monitoring software, communicates and operates as a single, optimized unit.
India presents a unique set of challenges that make proper inverter integration especially important. Grid instability, frequent voltage fluctuations, extreme temperatures, monsoon humidity, and dust-laden rooftops all stress inverter components in ways that milder climates do not. Add to this the diversity of DISCOM regulations across states, varying net metering policies, and the rapid adoption of high-wattage panels, and it becomes clear why a structured, technically rigorous integration process is non-negotiable for Indian EPCs.
There are two primary integration pathways in the Indian market today. On-grid inverter integration connects the solar array directly to the utility grid, enabling net metering and eliminating the need for battery storage. Hybrid inverter integration adds a battery bank to the system, providing backup power and greater energy independence. Both pathways require careful planning, precise wiring, and thorough commissioning to perform reliably over the inverter’s lifespan. For a deeper look at how to choose between these two options, see our guide on Solar Inverter Selection: 10 Critical Criteria for EPCs.
Qbits inverters are engineered specifically for Indian conditions, featuring IP66 weather protection, DC and AC surge protection devices, 98% efficiency, and AI-powered WhatsApp monitoring. Every unit passes 1,000+ automated quality tests before leaving the factory. This guide uses Qbits integration procedures as the reference standard, but the principles apply broadly across quality inverter brands.
1. Pre-Installation Planning for Inverter Integration
Successful inverter integration begins long before a technician sets foot on the rooftop. Thorough pre-installation planning prevents costly rework, ensures regulatory compliance, and sets the foundation for a high-performing system.
Site Assessment and Load Profiling
Start with a detailed site survey. Measure roof orientation and tilt angle, map shading obstructions across different times of day, and document the available mounting area. Simultaneously, analyze the client’s electricity bills to build an accurate load profile. Understanding peak demand, daily consumption patterns, and grid tariff structure directly informs inverter sizing and configuration decisions.
Selecting the Right Inverter Type
Match the inverter type to the project requirements. For grid-connected residential and C&I projects without backup needs, an on-grid inverter is the cost-effective choice. For projects requiring power backup, time-of-use optimization, or off-grid capability, a hybrid inverter India solution is the right fit. Qbits offers both on-grid and hybrid inverters, with on-grid residential models supporting panels up to 750W and commercial models scaled for larger C&I installations. Review our Solar Inverter Manufacturers in India: Complete Evaluation Guide to benchmark specifications before finalizing your selection.
Inverter Sizing and DC Oversizing
Proper sizing is critical for inverter integration performance. Undersizing the inverter clips energy yield; oversizing it wastes capital. As a rule, the total DC capacity of the string array should not exceed the inverter’s maximum DC input rating. However, strategic DC oversizing, up to 100% with Qbits inverters, can increase annual energy yield by capturing more generation during low-irradiance periods. Calculate the DC-to-AC ratio carefully based on your site’s irradiance data and the client’s energy goals.
Regulatory and DISCOM Compliance
Before procurement, confirm the applicable DISCOM regulations for the project location. Net metering policies, anti-islanding requirements, and approved equipment lists vary significantly across Indian states. Ensure the selected inverter carries BIS and IEC certifications, as these are mandatory for grid-connected systems in most states. Prepare the net metering application documents in parallel with the installation timeline to avoid commissioning delays.
Pre-Installation Checklist for EPCs
- Site survey completed with shading analysis and load profile
- Inverter model and capacity confirmed against string design
- BOS components procured: DC/AC SPDs, MCBs, cables, conduits, earthing materials
- DISCOM net metering application submitted or in progress
- Mounting structure and wall bracket specifications confirmed
- Safety equipment on-site: insulated tools, PPE, lockout/tagout devices
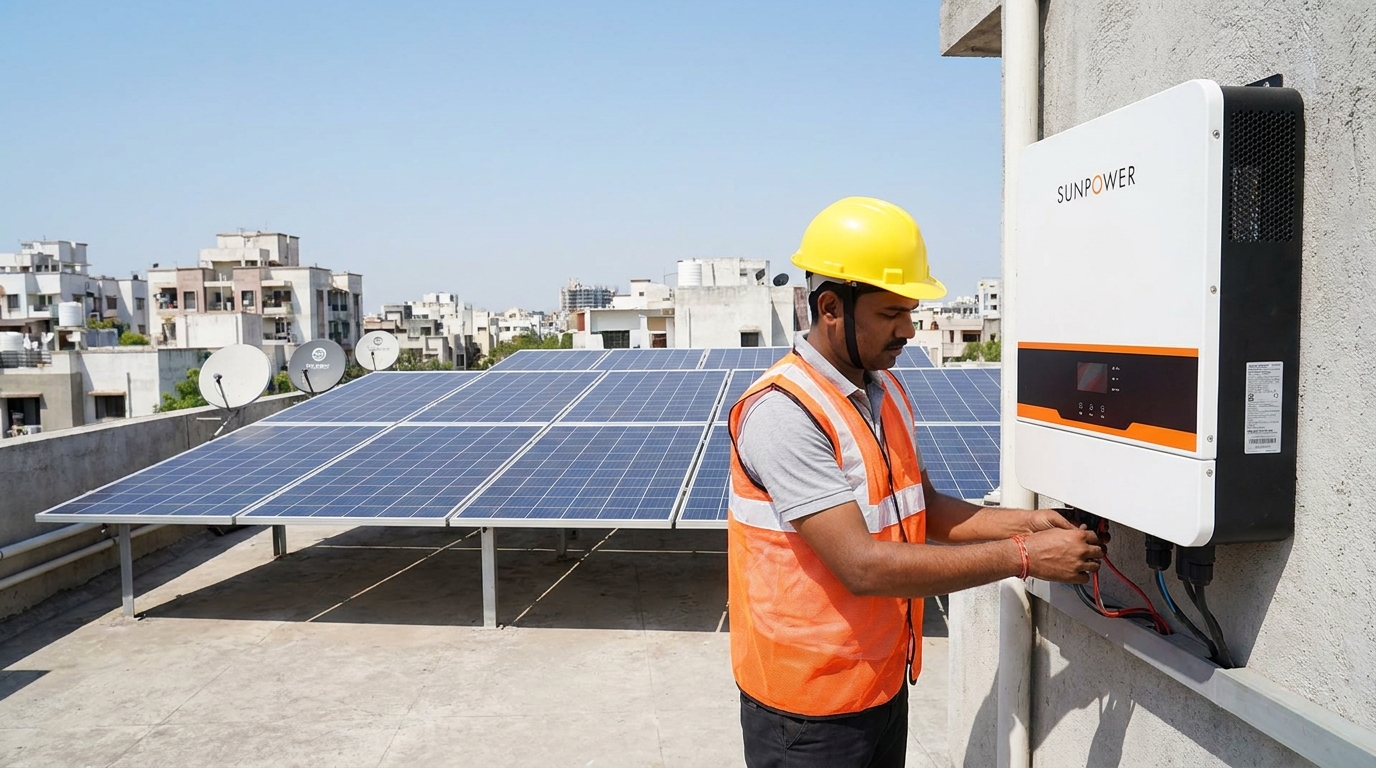
2. Mechanical Installation and DC-Side Wiring
With planning complete, the physical inverter integration process begins. Mechanical installation quality directly affects inverter longevity and maintenance accessibility.
Mounting the Inverter
Mount the inverter on a solid, vertical wall surface that can bear the unit’s weight. Maintain the manufacturer-specified clearances on all sides, typically a minimum of 300 mm on the top and sides and 500 mm below, to ensure adequate airflow and heat dissipation. Avoid direct sunlight exposure on the inverter body where possible, as elevated ambient temperatures reduce efficiency and accelerate component aging. Qbits inverters carry IP66 weather protection, making them suitable for outdoor rooftop mounting in Indian conditions, but shaded placement is always preferred.
String Configuration and DC Wiring
Design your string configuration to keep the open-circuit voltage (Voc) within the inverter’s maximum DC input voltage rating under the coldest expected temperature at the site. Use the temperature coefficient of Voc from the panel datasheet to calculate worst-case Voc. Route DC cables in UV-resistant conduits, maintain separation between positive and negative conductors where possible, and use appropriately rated MC4 connectors. Label all strings clearly at both the panel end and the inverter end.
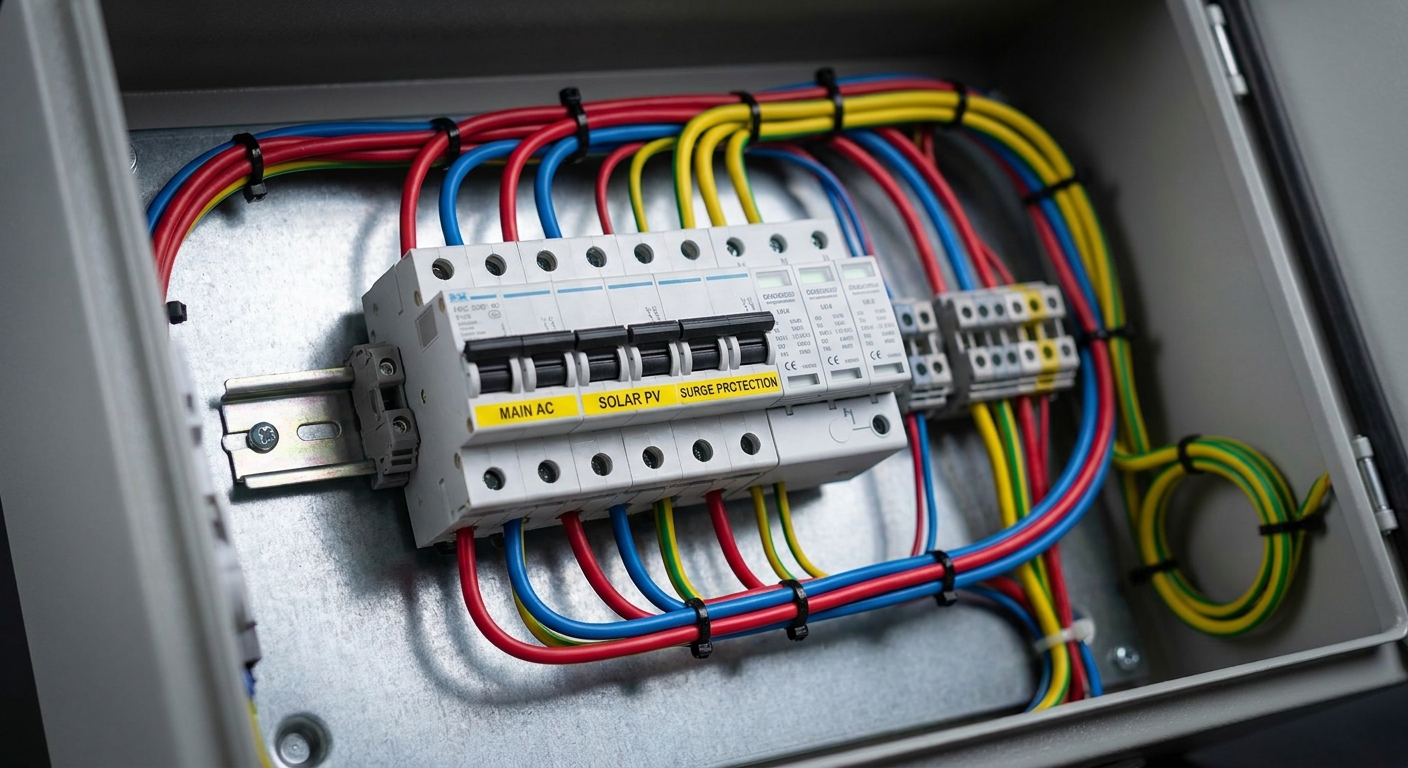
Installing DC Surge Protection Devices
DC SPDs are a mandatory component of safe inverter integration in India, where lightning strikes and grid transients are common. Install Type 2 DC SPDs at the inverter’s DC input terminals. Qbits inverters include integrated DC SPD provisions, simplifying this step. Verify SPD ratings match the system’s maximum DC voltage and short-circuit current before connection.
Pre-Energization DC Checks
- Verify polarity of each string with a multimeter before connecting to the inverter
- Measure open-circuit voltage of each string and confirm it is within inverter specifications
- Check insulation resistance between DC conductors and earth (minimum 1 MΩ)
- Confirm all MC4 connectors are fully seated and locked
- Ensure DC isolator switch is in the OFF position before proceeding to AC wiring
3. AC-Side Connection and Grid Integration Procedure
AC-side inverter integration connects the inverter’s output to the building’s electrical distribution system and, ultimately, to the utility grid. This stage requires strict adherence to Indian electrical standards and DISCOM requirements.
AC Wiring and Distribution Board Connection
Run appropriately sized AC cables from the inverter’s AC output terminals to a dedicated solar MCB in the main distribution board. Use copper conductors sized for the inverter’s rated AC output current with a safety margin of at least 25%. Install the cables in conduits, maintain separation from DC wiring, and label all conductors at both ends. For three-phase inverters used in C&I inverter integration projects, ensure balanced phase loading and correct phase sequence before energization.
AC Surge Protection and Protection Devices
Install Type 2 AC SPDs at the distribution board to protect against grid-side transients. Qbits inverters include integrated AC SPD provisions as standard. Add an appropriately rated AC isolator between the inverter and the distribution board to enable safe maintenance isolation. Confirm that the main distribution board’s earth leakage circuit breaker (ELCB) or residual current device (RCD) is compatible with the inverter’s leakage current characteristics.
Earthing and Grounding
Proper earthing is one of the most critical and most frequently overlooked aspects of inverter integration in India. Connect the inverter’s earth terminal to the building’s main earthing system using a conductor of at least 6 mm² copper. Earth all metallic mounting structures, panel frames, and conduits. Measure earth resistance with an earth tester and confirm it is below 5 Ω, as required by IS 3043 and most DISCOM guidelines.
Grid Connection and Anti-Islanding Compliance
Before connecting to the grid, verify that the inverter’s grid protection settings comply with the applicable DISCOM’s technical standards. Key parameters include under/over voltage trip thresholds, under/over frequency trip thresholds, and reconnection delay times. Qbits inverters are pre-configured with settings compliant with Indian grid standards, but always confirm with the local DISCOM before commissioning. Anti-islanding protection is mandatory for all grid-connected inverter integration projects in India and is built into Qbits inverters as a certified feature.
First Power-On Sequence
- Confirm all DC and AC isolators are in the OFF position
- Close the AC grid isolator first to allow the inverter to synchronize with the grid
- Close the DC isolator to allow the inverter to start its self-test sequence
- Observe the inverter display for startup messages and confirm no fault codes are present
- Verify AC output voltage, frequency, and power factor on the inverter display
- Confirm grid export is occurring and the generation meter is registering correctly
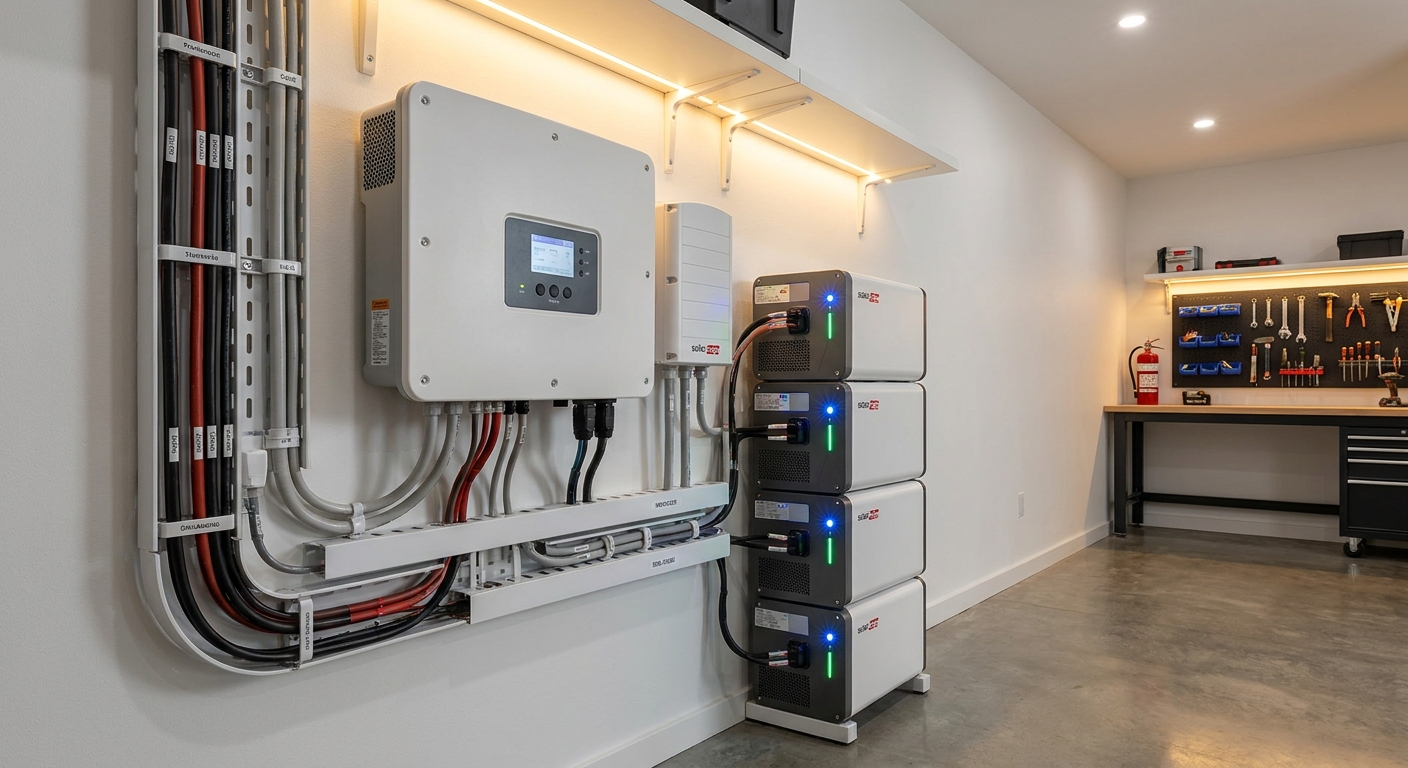
4. Battery Integration for Hybrid Inverter Setups
Hybrid inverter integration adds a layer of complexity and value to the standard on-grid process. A well-integrated battery system provides backup power, enables time-of-use optimization, and significantly improves energy independence for residential and C&I clients.
Battery Selection and Sizing
Lithium-ion batteries, particularly LiFePO4 chemistry, are the preferred choice for hybrid inverter India installations due to their longer cycle life, higher depth of discharge, and lower maintenance requirements compared to lead-acid alternatives. Size the battery bank based on the client’s backup duration requirement and daily energy consumption during outages. Confirm that the battery’s voltage range and communication protocol (CAN bus or RS485) are compatible with the Qbits hybrid inverter model selected.
Battery Wiring and BMS Integration
Connect the battery bank to the inverter’s dedicated battery DC terminals using appropriately sized cables with a fused disconnect. Never connect batteries without a Battery Management System (BMS) in the circuit. The BMS protects against overcharge, over-discharge, overcurrent, and thermal runaway. Configure the BMS communication link to the inverter so that the inverter can read state-of-charge data and adjust charging behavior accordingly.
Configuring Charge and Discharge Parameters
Access the inverter’s configuration menu to set battery-specific parameters. Key settings include maximum charge voltage, minimum discharge voltage (to protect battery longevity), maximum charge current, and maximum discharge current. Set these values according to the battery manufacturer’s specifications. Incorrect settings are a leading cause of premature battery degradation and are a common source of warranty disputes.
Setting Energy Priority Modes
Qbits hybrid inverters support multiple energy priority modes to match different client needs:
- Solar-First Mode: Prioritizes solar generation for loads, charges battery with surplus, exports remaining to grid
- Battery-First Mode: Uses battery power for loads before drawing from the grid, ideal for time-of-use tariff optimization
- Grid-First Mode: Uses grid power as the primary source, reserves battery for backup, suitable for areas with stable grid supply
- Backup Mode: Keeps battery at a set state of charge for emergency backup, charges from solar and grid as needed
Select the mode that best aligns with the client’s energy goals and local grid conditions. For C&I projects with demand charge management requirements, battery-first mode during peak tariff hours can deliver significant cost savings.
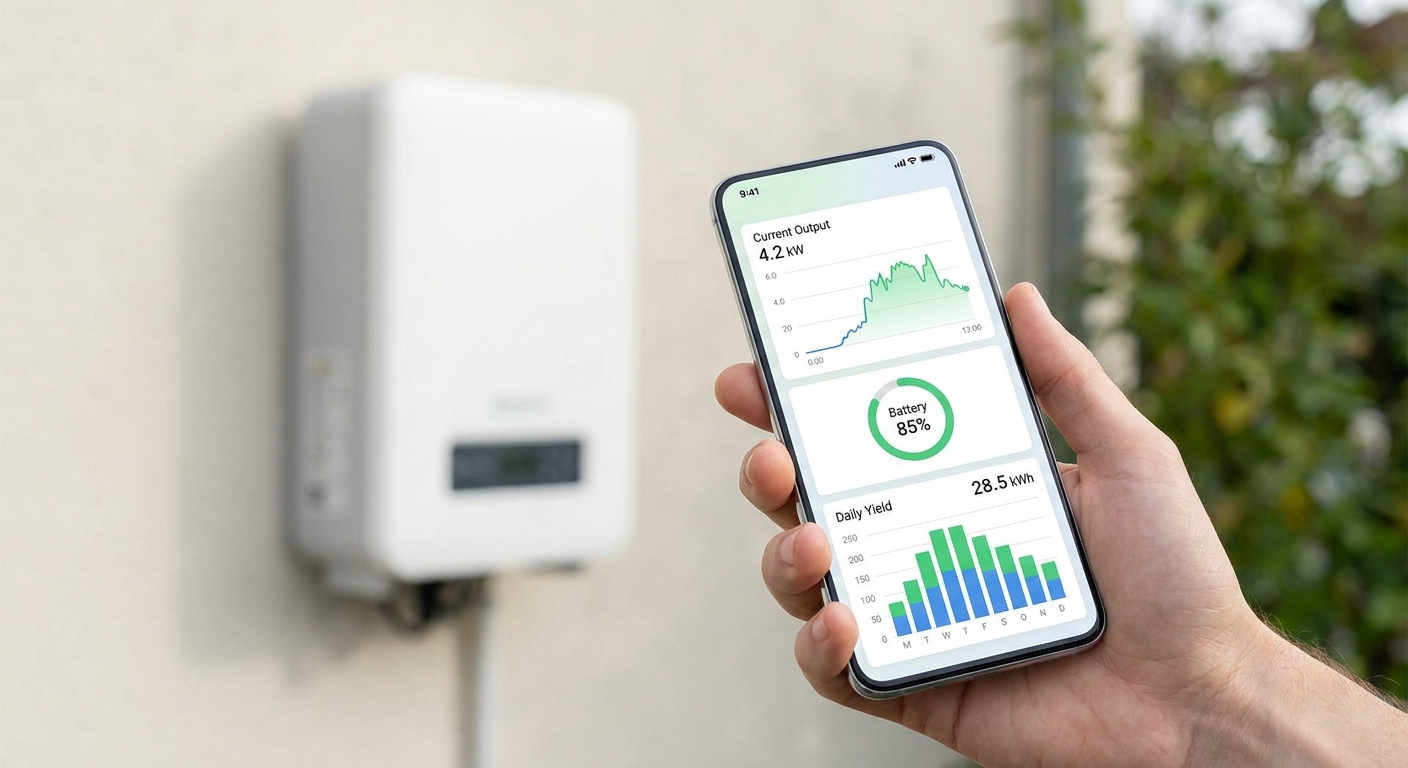
5. Monitoring System Setup: Wi-Fi, 4G, and Bluetooth Configuration
A solar system without monitoring is a system flying blind. Inverter monitoring is not an optional add-on; it is a core component of professional inverter integration that enables proactive fault detection, performance verification, and client satisfaction. Qbits inverters feature an AI-powered monitoring system with Wi-Fi, 4G, and Bluetooth connectivity, giving EPCs and system owners real-time visibility from anywhere.
Wi-Fi Setup and Cloud Connection
For residential and commercial sites with reliable Wi-Fi coverage, connect the inverter to the local network using the built-in Wi-Fi module. Access the inverter’s configuration interface via the Qbits monitoring app or web portal, navigate to the network settings, and enter the Wi-Fi credentials. Once connected, the inverter will begin transmitting real-time generation data, fault logs, and performance metrics to the Qbits cloud platform. Data is stored on India-based servers, ensuring data security and compliance with local data residency requirements.
4G Configuration for Remote Sites
Many C&I and agricultural solar projects in India are located in areas with limited or no Wi-Fi infrastructure. For these sites, configure the inverter’s 4G connectivity using a compatible SIM card dongle. Insert the dongle into the inverter’s USB port, configure the APN settings for the SIM provider, and verify cloud connectivity through the monitoring portal. 4G monitoring ensures that even the most remote installations remain fully visible and manageable.
Bluetooth Pairing for On-Site Commissioning
Bluetooth connectivity is particularly useful during the commissioning phase. Use the Qbits app on a smartphone or tablet to pair with the inverter via Bluetooth for on-site configuration, parameter adjustment, and real-time diagnostics without needing network connectivity. This is invaluable during initial setup and for on-site troubleshooting visits.
Activating WhatsApp Monitoring Alerts
One of Qbits’ most distinctive features is its AI-powered WhatsApp monitoring system. Once cloud connectivity is established, register the client’s WhatsApp number in the monitoring portal to activate automated alerts. The system sends real-time notifications for fault events, generation anomalies, grid disconnections, and daily performance summaries directly to WhatsApp, a platform that virtually every Indian solar system owner already uses. This dramatically reduces response times to system issues and improves client satisfaction. For a comprehensive overview of monitoring options and best practices, refer to our detailed guide on Solar Inverter Monitoring Systems in India (2026).
Setting Performance Thresholds and Fault Notifications
Configure performance thresholds in the monitoring portal to trigger alerts when generation falls below expected levels. Set fault notification priorities so that critical faults (grid disconnection, DC arc fault, over-temperature) generate immediate WhatsApp alerts, while informational events are logged for periodic review. This tiered notification approach prevents alert fatigue while ensuring that serious issues receive immediate attention.
6. Smart Feature Activation and System Configuration
Modern solar inverters like those from Qbits offer a range of smart features that go beyond basic DC-to-AC conversion. Activating and correctly configuring these features is an essential part of professional inverter integration that maximizes system performance and client value.
Grid Parameter Configuration
Access the inverter’s grid settings menu and verify that voltage and frequency trip thresholds are set according to the applicable Indian grid standard (CEA Grid Connectivity Standards or the relevant DISCOM technical specification). For most Indian grid-connected systems, the standard settings are:
- Under-voltage trip: 184V (single-phase) / 318V (three-phase line-to-line)
- Over-voltage trip: 264V (single-phase) / 457V (three-phase line-to-line)
- Under-frequency trip: 47.5 Hz
- Over-frequency trip: 51.5 Hz
- Reconnection delay: 60 seconds minimum after grid restoration
Always confirm these values with the local DISCOM before commissioning, as requirements vary by state and utility.
DC Oversizing Activation
Qbits inverters support up to 100% DC oversizing, meaning you can connect a DC array with up to twice the inverter’s rated AC output capacity. This feature increases annual energy yield by allowing the inverter to operate at or near full output for a greater portion of the day, particularly during morning and evening shoulder periods when irradiance is lower. Enable DC oversizing in the inverter’s configuration menu and confirm that the maximum DC input voltage and current limits are not exceeded under any operating condition.
Low Start-Up Voltage Configuration
Configure the inverter’s minimum start-up voltage to the lowest value permitted by the system design. Qbits inverters are designed to start generating at low irradiance levels, extending the daily generation window and improving overall system yield. This feature is particularly valuable in locations with frequent morning fog or haze, which are common in many parts of India during winter months.
Reactive Power and Power Factor Settings for C&I Projects
For commercial and industrial inverter integration projects, configure reactive power settings to meet the DISCOM’s power factor requirements. Many Indian DISCOMs require commercial consumers to maintain a power factor above 0.95. Qbits commercial inverters support reactive power control modes (Q(U), cos φ(P)) that can be configured to automatically maintain the required power factor, avoiding penalty charges for the client.
Firmware Updates and Certification Compliance
Before completing commissioning, check the inverter’s firmware version and update to the latest release if available. Firmware updates often include performance improvements, new grid standard compliance updates, and bug fixes. Confirm that the installed firmware version maintains BIS and IEC certification compliance. Document the firmware version in the commissioning report for warranty and service reference.
7. Post-Commissioning Checks and Performance Optimization
Commissioning is not complete when the inverter starts generating power. A structured post-commissioning process ensures that the inverter integration is performing as designed and that the client is set up for long-term success.
Commissioning Report Checklist
Prepare a comprehensive commissioning report that documents every aspect of the inverter integration. This report serves as the baseline reference for future maintenance and warranty claims. Key items to include:
- Inverter model, serial number, and firmware version
- String configuration: number of strings, panels per string, panel model and wattage
- DC open-circuit voltage and short-circuit current measurements per string
- AC output voltage, current, frequency, and power factor at commissioning
- Earth resistance measurement result
- Grid protection settings confirmed and documented
- Monitoring system connectivity verified (Wi-Fi/4G/Bluetooth)
- WhatsApp alert registration confirmed
- Battery parameters configured (for hybrid systems)
- Client walkthrough completed and sign-off obtained
Verifying Performance Against Design
Monitor the system’s performance data for the first seven days after commissioning. Compare actual generation against the design estimate from your simulation software. A well-executed inverter integration should deliver generation within 5% of the simulated value under comparable irradiance conditions. If generation is significantly below expectations, investigate potential causes: shading not captured in the design, string wiring errors, incorrect configuration settings, or panel soiling. Qbits’ AI-powered monitoring system flags performance anomalies automatically, making this verification process straightforward.
Inverter ROI and Long-Term Performance Planning
Help your clients understand the financial impact of their solar investment by setting up regular performance reporting through the monitoring portal. A properly integrated Qbits inverter operating at 98% efficiency with a 12-year full replacement warranty provides a strong foundation for inverter ROI calculations. For detailed guidance on financial planning around inverter performance and replacement cycles, see our Solar Inverter Lifespan: Complete Financial Planning Guide.
Digital Warranty Registration
Register the inverter’s warranty immediately after commissioning using Qbits’ digital warranty system. The 12-year full replacement warranty is one of the strongest in the Indian market, but it must be activated through the digital registration process to be valid. Clients can download their warranty documentation directly from the Qbits support portal. Ensure this step is completed before leaving the site and include the warranty registration confirmation in the commissioning report.
Preventive Maintenance Schedule
Establish a preventive maintenance schedule with the client at the time of commissioning. For most Indian residential and C&I installations, a bi-annual maintenance visit covering panel cleaning, connection torque checks, SPD status verification, and monitoring data review is sufficient to maintain peak performance. The Qbits monitoring system’s continuous fault detection reduces the risk of undetected degradation between scheduled visits. For ongoing technical support, EPCs and clients can access the Qbits support helpdesk at any time.
Frequently Asked Questions About Inverter Integration in India
How long does solar inverter integration take for a residential project?
A standard residential on-grid inverter integration, covering mechanical installation, DC and AC wiring, grid connection, and monitoring setup, typically takes one to two days for an experienced EPC team. Hybrid inverter integration with battery installation adds approximately half a day to the timeline. Complex C&I projects with multiple inverters and three-phase connections may require three to five days.
What is the difference between on-grid and hybrid inverter integration?
On-grid inverter integration connects the solar array to the utility grid only, with no battery storage. The system exports surplus energy to the grid and draws from the grid when solar generation is insufficient. Hybrid inverter integration adds a battery bank to the system, enabling energy storage, backup power during grid outages, and time-of-use optimization. Hybrid integration requires additional steps for battery wiring, BMS configuration, and energy priority mode setup.
Do I need DISCOM approval for inverter integration in India?
Yes. All grid-connected solar inverter integration projects in India require DISCOM approval and net metering connection. The approval process involves submitting a technical application with system specifications, inverter certifications (BIS/IEC), and single-line diagrams. Processing times vary by state and DISCOM, ranging from a few weeks to several months. It is advisable to submit the application well in advance of the planned commissioning date.
Can I integrate a Qbits inverter with existing solar panels?
Yes, in most cases. Qbits inverters are compatible with all standard crystalline silicon solar panels. The key compatibility checks are maximum DC input voltage (ensure the string Voc does not exceed the inverter’s limit), maximum DC input current per MPPT, and total DC capacity relative to the inverter’s rated AC output. Qbits inverters support panels up to 750W and up to 100% DC oversizing, making them compatible with virtually all modern high-wattage panel configurations. Contact the Qbits technical support team for a compatibility assessment if you are retrofitting an existing installation.
What warranty support is available after inverter integration?
Qbits provides a 12-year full replacement warranty on all inverters, backed by a digital warranty system for easy registration and claim management. In the event of a warranty claim, Qbits provides a replacement unit rather than a repair, minimizing system downtime. The warranty is activated through the digital registration process at commissioning. EPCs can manage all warranty documentation and claims through the Qbits support portal.
Take the Next Step in Professional Inverter Integration
Mastering solar inverter integration is what separates high-performing EPCs from the rest of the market. Every step in this guide, from pre-installation planning and DC-side wiring to hybrid battery configuration, monitoring setup, and post-commissioning optimization, contributes to systems that deliver on their performance promises and build long-term client trust. In India’s rapidly growing solar market, the EPCs who invest in integration excellence are the ones who win repeat business, referrals, and a reputation for quality.
Qbits inverters are built to support that excellence. With 98% efficiency, IP66 weather protection, AI-powered WhatsApp monitoring, 12-year full replacement warranty, and German-grade components tested through 1,000+ quality checks, Qbits gives your inverter integration projects the technical foundation they need to perform for decades. Explore the full Qbits product range at qbitsenergy.com/our-products, or if you are ready to discuss your next project’s inverter integration requirements, send us an inquiry on WhatsApp and our technical team will respond promptly. EPCs and distributors looking to build a long-term partnership with a next-generation Indian inverter manufacturer are also welcome to apply to become a Qbits partner. For inverter pricing strategies that complement your integration workflow, our guide on Solar Inverter Pricing Strategies for EPCs (2026) is an essential read.
This blog post was written using thestacc.com